When you have a musician coming in to the studio to work, you want them to have the best experience they can. Your job is to make the recording process as transparent or invisible as possible for them. This allows them to totally concentrate on their playing and creativity without having to worry about the technical aspects of the recording process. I recently had a friend come in to start working on a new song. Time is a precious commodity so we wanted to complete as many tracks as possible in one session. He wanted to see if we could complete the guitar, bass and vocal tracks in one session. We’ve worked together before and he’s an amazing musician, so I knew he’d hold up his end and have his track ideas ready to go. My job is to have the studio prepared to move seamlessly from one track to another. Here’s some basic preparation steps that will allow you to do that in the studio.
1) Decide what equipment you’re going to use. One of my goals is to give the musician multiple sonic options whenever possible. In this case that applies mostly to the guitar sound. If the musician has a particular amp or effect pedal of their own that they want to use, I try to get it in to the studio before they get there so I can have it miced and pathed. In this case we were using all in house studio equipment and decided to use stomp box FX pedals instead of rack mounted FX units. This photo shows the overall floor pedal setup.
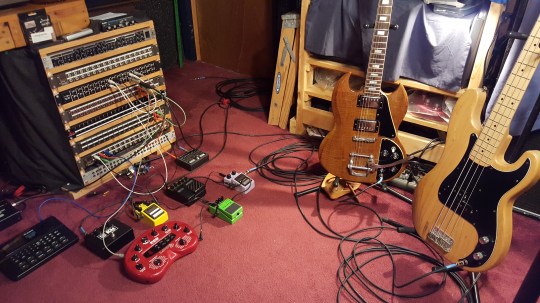
2) Set up the effect path. The guitar signal is split at the stereo chorus pedal (the pink pedal). One line goes to a delay pedal, a flanger and a distortion pedal to an amplifier. The other line goes to a phase shift pedal and then in to a POD direct in amp emulator. This allows for a variety of guitar sounds to be recorded in one pass, both amped and direct in. The order of the pedals does make a difference in the overall sound. You can try several configurations to get what you want.

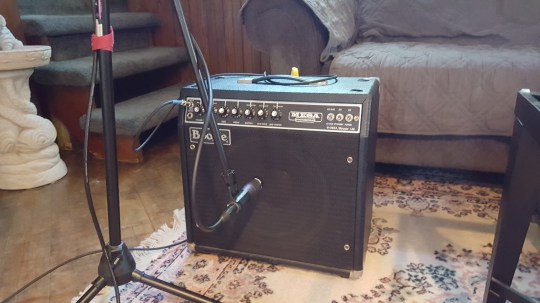
The output from the distortion pedal goes to an amplifier set up in another room. Although this large room is great for natural reverb, in this case the amp is just close miced with an SM57.
The bass guitar goes to a ten band EQ pedal. You can see it in the upper right picture of all the floor pedals. I love this pedal for bass, whether recording or live. It allows you to really dial in a specific EQ as well as boosting the signal if necessary. Two other items will go in to the patch bay. One is the drum machine seen in the upper left of the pedal picture to use for a click track. For vocals we have a Neumann mic going in to the patch bay.

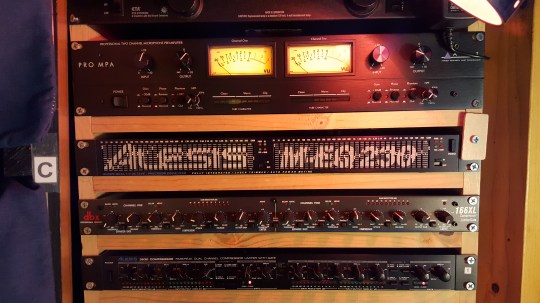
3) Set up the signal path through your patch bay. This is where you run your incoming signals in to the rack mounted units then in to your mixing boards. I have paper diagrams of all the patch bays connections – when you have a lot of connections you don’t want to make any mistakes.
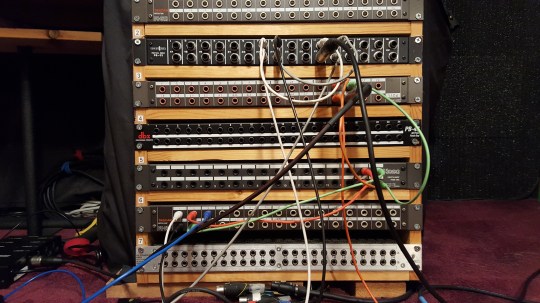
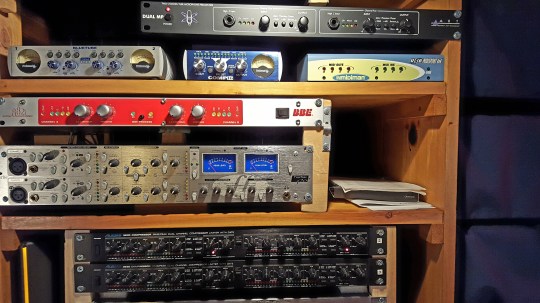
For this session all the inputs except the drum machine will run in to rack mount pre-amps and compressors/noise gates. Although the mixing boards have pre-amps and compression for each channel, I like using the higher quality outboard units. For me they’re also easier to fine tune.
4) Set up the signal path through the mixing boards. Decide what channels in the mixing board each signal is going to. I’d advise coming up with a logical system that works for you. I tend to set up multiple recording tracks by instrument the same way for most sessions. This makes my life a lot easier as ‘muscle memory’ will kick in if you’re trying to move quickly to make an adjustment during a recording take.

This is also where you select where each track will go in to your recording software. On a digital mixing board you should have a page that defines where the signal will be sent to. Again, try to maintain a consistent logic as you do this setup.

You can now set up the tracks in your recording software. You’ll want to keep the same order whenever possible. I usually have tracks that go left to right on the mixing board go top to bottom in the recording software.

5) OK, here’s where the organization part really needs to kick in. I like to create a chart for everything in the recording path. With this many transitions and connections, there’s a pretty good chance you could have some type of failure in one of the pathways during the session. The last thing you want to do is have to start guessing where a problem is while you’re trying to record. I don’t want to have the musicians standing around waiting while I’m trying to make a fix. It just feels less professional to me. And it could put a stall on the musician who was on a roll. Inspiration is like lightning in a bottle. When you catch it you want to keep it.

6) Test every pathway. I go one path at a time and test all the connections from the instrument all the way in to the recording software. I work to get a good strong signal level at each stop. Make sure the effects pedals work. Get a good strong signal in the pre-amps, compressors, mixing boards and software. Get basic settings ready in the pre-amps and compressors. That way when you’re recording the changes will be tweaks rather than ‘where the hells the signal?’. This is when you can change out a cable if it’s causing a problem.
All of this does take time. And nothing is perfect. You’ll probably hit some small glitch in any session you do. But when you get to run a smooth recording session it will all be worth it. In the session I was referencing in the beginning we completed the click track, four guitar tracks, the bass and three vocal tracks in a three hour period. And the session was a lot of fun. You can’t ask for much more than that. Now – go out there and create!
